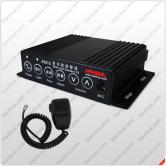
Loa cần cẩu và bộ điều khiển AS210/211/212
AS210/AS211/AS212 Còi báo động và bộ loa được thiết kế đặc biệt cho các cần cẩu, giàn cần trục, cầu trục và được sử dụng trong bến cảng, Nhà máy luyện kim và mỏ than vv Các sản phẩm này có kích thước nhỏ gọn, ngoại hình đẹp, dễ dàng gắn kết và hoạt động. Ứng dụng thực tế cho thấy rằng nó đóng một vai trò quan trọng trong đảm bảo an toàn về người và thiết bị.
Specifications
| Description | Parameter |
|---|---|
| Applications | Used in the cabs of engineering machinery (travelling cranes, crawler cranes, truck cranes and etc.),port machinery(gantry crane, overhead travelling cranes and etc.). |
| Supply voltage | AC110V~265V/DC110V~260V |
| Frequency | 50Hz~60Hz |
| Standard | GB/8108-1999 |
| Tone | A、B、E(customized available) |
| dB | 106dB~110dB |
| Speaker | 10W/8Ω 25W/16Ω 50W/16Ω |
| Power | 10W/25Wx1/25Wx2/50W |
| Output Carrier power | 200W |
| Ambient temperature | -30˚C ~ +60˚C |
| Humidity | 10% ~ 95% (non-condensing) |
| Material | Aluminum alloy |
| Weight | 1.5kg |
Functions & Features
- Speaking prior to alarm.
- Volume adjustable.
- Microphone & Loudspeaker available.
- Various tones to choose from.
- Visible and audible alarm synchronous (optional).
- Power off memory, can hold the setting data.
- Several kinds of combination mode for choose.
- Nice appearance, convenient opeartion.
Model Selection
| Model | Installation | Tone | Loudspeaker | Microphone | Power |
|---|---|---|---|---|---|
| AS210 | Flat installation | A/B/E/ Speech | 10W/8Ω(YH10-2) | SE/SS-A | 10W |
| AS211 | Flat installation | A/B/E/ Speech | 25W/16Ω(YH25-3) | SE/SS-A | 25W×1/25W×2 |
| AS212 | Flat installation | A/B/E/ Speech | 50W/16Ω(YH50-3) | SE/SS-A | 50W |
Accessories products
Installation and operation
- Mount the device onto mounting surface with M5 (push-in type) or M6 screws (surface mounting), the mounting surface should have enough strength to hold the device.
- Make sure power supply is matched to the device’s rated voltage, and noted the Polarity, Wiring the device base on “wiring drawing” to connect external devices, and please take notice of negative and positive pole when connect the gooseneck microphone.
- Power on, the red power indicator lighting, push the key of ′ON/OFF’ the indicator off, and the controller will be the standby mode, push again the controller will be the operation mode.
- Push the “alarm indicator” switch, the yellow indicator lighting, and the alarm light terminal with AC220V output at the same time. Push again will be off.
- When push the alarm button, alarm system operation, and at the same time, yellow indicator will lighting, the alarm terminal with AC220V output, loudspeaker will with alarm, push the alarm button again, alarm system and indicator will stop at the same time to obtain the Visible and audible alarm synchronous function.
- Tone select;push the tone button, the A、B、E tone will be alarm cycles, please choose the tone you want.
- Volume adjust, through the ∧ and ∨ of Volume to turn up and turn down the volume, if under the alarm condition, push the ∧ and ∨ of Volume to turn up and turn down the alarm volume; Push the microphone switch can be speaking, and constant push can adjust the volume of speaker.
- Gooseneck microphone connected in the back board terminal, please noticed the negative and positive pole, handheld speaker connected in the frond board MIC, push the speaker switch, or close the gooseneck microphone can be speaking amplifier, at this time can through the volume adjust button to turn up and turn down the volume.
Mounting dimension(unit: mm)& Wiring Connection
Operation panel
Notice
- The controller of this product is the indoor type.
- Wiring correct, please avoid overload and Short circuit.
- Check the supply power whether can match the rated power.
- Loudspeaker power should with the standard configuration.
- Temperature increasing when using will happen.
- Do not open controller box. Any questions please contact us.
- Please use this device after reading instruction manual.
- Any questions please contact us.


